And on to a few more projects. This I have shared before, but I added a little more to it. It was to simple for me like it was, so I added a few fabric rosettes. I think it finishes it off quite well.
Showing posts with label for the home. Show all posts
Sunday, February 13, 2011
FYI Silhouette Users
For those of you who have a Silhouette machine and are still using the Craft ROBO, there is something better. As awesome as this software is, there is better (like I said before). Somehow, I was out of the loop and did not know that Silhouette had put out their own version of software. I was very confused when I looked at other peoples tutorials and their software looked completely different! Duh! They upgraded! Somehow I stumbled across it last week and I thought I would share it with whomever is interested. Here is where you go to download the new software. And if I haven't mentioned it yet, it is so much better! All those things that you wished you could do in Craft ROBO (like erasing, cutting, viewing the image dimensions, etc.) you can do now! And, the even better part is it's FREE! And all your purchased images are transferable! It's a win-win! I haven't played with the new software a whole lot, but I am going to go back through those tutes that I passed over because I didn't have the same software. I hope this makes at least one person's life a little easier!
And on to a few more projects. This I have shared before, but I added a little more to it. It was to simple for me like it was, so I added a few fabric rosettes. I think it finishes it off quite well.
Lovely!
This picture is hanging in our kitchen. We have a phone outlet in our kitchen that doesn't screw into the wall very well. It sometimes just hangs there and it is kind of an eye sore so this painting is covering that up. It is another frame I had and just painted black. I picked out some scrapbook paper that I liked and put it in the frame. The saying and the flourish I did myself on the Silhouette. I cut it out on some vinyl and applied it to the outside of the frame. Because I change my mind quite often, I put the vinyl on the glass. That way I can change the paper out whenever I want!
Looking back, I should have made the words a little bigger, but over all, I love how it turned out.
I see this picture everday, multiple times a day. This phrase is a constant reminder to find joy in whatever season I am in. No matter what trials, uncertainties, or problems I am having, it is a reminder to rejoice and find joy because our lives are a journey to a much better place. We are just passing through this life. Where we end up is undescribable. I am also reminded of Romans 8:18, "For I consider that the sufferings of this present time are not worth comparing with the glory that is be revealed to us." (Thanks Krissy for sharing that verse with me) I have so much to be thankful for and even though I will encounter trials, I will learn to rejoice through them!
And on to a few more projects. This I have shared before, but I added a little more to it. It was to simple for me like it was, so I added a few fabric rosettes. I think it finishes it off quite well.
Labels:
for the home,
Silhouette
Tuesday, February 1, 2011
Me and my new best friend...
I am constantly amazed at what this thing can do! It is awesome. We have been spending a lot of time together. Probably time I should be cleaning, organizing, or exercising. But this is much more fun! This morning I have been doing lots with it. I still haven't mastered the fabric cutting, but I hope to be able to spend some more time on it soon. Here are a few things that I have done.
These are some frames (the two smaller ones) I have had put away for a while. They were boxed up when we were "staging" our house to sell. They could use a painting, but for now thew will do.
This was a sketch done with the Silhouette pen! I love this thing. I just ordered the metallic pens and I can't wait to see how they turn out. I don't have very much, actually none at all, Valentines decorations. So I figured I could make a few. These were quick and easy! My kind of craft!
The first blooms from my Camellia bush! I had to include it in the picture. I can't wait for the rest to bloom!
There is a narrow wall behind our couch that needed a little something. Looking at it now, it kind of looks like it should be in a diner with the diamond background. Oh well. There again, it was cheap and easy. The frame was a light brown wood. I repainted it mixing a green and white I already had.
Labels:
cards,
for the home,
Silhouette
Thursday, January 7, 2010
Still Slacking...
I am still slacking. I have been very busy with different crafts and thankfully lots of January birthdays! So not much has slowed down since the holidays. A few things have changed since the last post. We are now in the process of buying a house. It is a foreclosure and we are getting a great deal on it. We found out about it a few days after we moved into the rental! So, still living out of boxes. Thankfully, both of our parents are in town so we can mooch off of them for supper and we don't have to eat out every night. No way am I unpacking all the kitchen stuff just to pack it back up in a few weeks! Hopefully, when we get moved into our new house I will be more diligent.
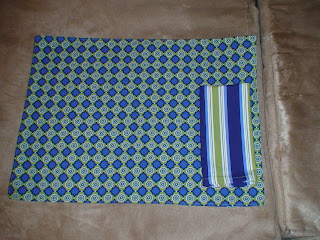
Now that Christmas is over I can share some of the things I was making for gifts! Remember this lovely fabric? (And now they have a brown and teal! I am trying to figure out how to incorporate it in our new house!)


Now that Christmas is over I can share some of the things I was making for gifts! Remember this lovely fabric? (And now they have a brown and teal! I am trying to figure out how to incorporate it in our new house!)
It's now a new addition to the in-laws lake house. I made some reversible placemats and cloth napkins.
Unfortunately, I did not have time to finish everything. I have to make six more placemats and napkins and a table runner. Hopefully, I will get these done before my MIL's birthday! I also made this luscious dish towel. I can't wait to make some more of these for my house! It's a great way to use up some scrapes.
These are super easy to make. I sewed each section together sewing right sides together. On the wrong side, iron down the seam, separating the fabric. Then sew one long side, right side together. Iron the side that was sewn. Fold over and iron and pin the remaining three sides. Topstich the remaining sides and the side already sewn. Your done! So simple and very cute!
More to come, hopefully soon! Take care and stay warm!
Labels:
for the home,
sewing
Wednesday, October 7, 2009
Fall decorations!!
Finally, I started on my fall decorations. I don't have a whole lot, but I did have some spray painting to do before I could finish. I have been gathering ideas over the past few weeks from blogland. It was time to take action and get things done! I think my overall favorite are the beauties!


So it got a make over also and turned out like this:


Vase makeover. So easy. That's why I like it! I found some cute scrapbook paper at Hobby Lobby and wrapped it around the vase.

That's a wrap! I might have to think of some more fall decorations to put out when Halloween is over! I just can't wait until Christmas!!!!

It started like this:
And this:
Not very attractive, I know. The idea came from here. I LOVE these candle holders (at least their shape)! I found them at TJ Max. It's pretty obvious, they don't match so I broke out the spray paint and fixed that problem! To my surprise the only black paint we had was a metallic looking black. So there is a slight sparkle to these if you look at them up close! The pumpkins came from the Dollar Store. They look great after a nice coat of paint!
This also came from the Dollar Tree. It's not too bad as is, but I wanted it black.
I just need to figure out what can go inside it??? As for now, it is sitting on a shelf in our living room.
Bleeding candle sticks!!! Oooo. These are kind of cool. The idea came from here. This tested my patience a bit. The paint took a while to dry. And then it was kind of tricky to get the wax to drip just right. But it turned out pretty good. (Please disregard the tarnished candlesticks! That's one more thing I have been putting off!) It's kind of hard to see, but there is red wax dripping down the sides.
Vase makeover. So easy. That's why I like it! I found some cute scrapbook paper at Hobby Lobby and wrapped it around the vase.
Now we have a spooky vase! Love it!
Labels:
for the home
Subscribe to:
Posts (Atom)