Tuesday, September 14, 2010

What we've been up to lately

Well, we finally moved!!! About 2 1/2 weeks ago! We are very blessed to have been able to buy this house. We are in a great neighborhood with great neighbors. I still can't believe we live here. I will post some pictures of the outside of our house soon.

We were very close to buying another house, but it didn't work out. At first I was really upset about it, but looking back I am very thankful for the way things turned out. God had His gracious hand in this process and blessed us with a much nicer home that is in a better neighborhood and has more character. This house is definitely one we will grow into and not out of. I hope to be here for a long time.

So, as with any move, there has been a lot of unpacking.

I realized, I don't mind packing up, but unpacking is not very much fun. I feel like everything is in total chaos, but I know our home will be in order soon. Hopefully!
Now we have to get ride of all these boxes! Anyone need boxes!!
I feel like I just keep creating piles of stuff and not doing anything with them! This is a goodwill pile that I keep putting off taking.

Here are more piles of stuff I don't know what to do with. This room will eventually be my craft room, but until then it is a catch all. I just need to dedicate a full day to this room. I can't wait to get all my sewing stuff here and paint the room a cheery, inspiring color!

In between all the unpacking and putting things away I had to break out the paint brush and paint. My first home improvement project: paint the half bath. We have one half bath downstairs that needed some color. It is still not 100% complete, but it looks much better. The tile in this bathroom is original to the house. It looks really neat.

This picture doesn't do it justice. I wanted to pick up a color that was complementary of this tile and was a little bold.

Here are some pictures before.

It had textured wallpaper that wasn't too bad. It was just a little too neutral for me. It really needed some color. While sitting on the bathroom floor with my sister-in-law I came across Exclusive Plum by Sherwin-Williams. I really liked the color and it became one of the top choices. A couple days later I came across a list of colors I had picked out for the other house that fell through. One of those colors was Exclusive Plum, and I was going to use it in the half bath of that house also. So that sealed the decision for the color.

Here are some after pictures:

It is not quite as rich as I wanted, but I really like how it turned out. Here is what the walls look like against the tile floor.

We want to eventually replace the vanity with an antique (or antique looking) chest and insert a vessel sink.

I have a few more rooms and bathrooms to paint, but I haven't decided on the colors. So more to come!

Have a great day!

Wednesday, August 25, 2010

The cutest models in the world...


Here are a few pictures of my nieces wearing some dresses I made them. Here is the yellow dress I posted last week. The straps were a little long. When Abby was taking her nap I adjusted them up a little. This dress is a little long, but I think I like it like that. Plus that means she will be able to wear it longer =)

Here is a pillowcase dress I made earlier this summer. I never took a picture of it so I couldn't post it. But here is a picture with Emma wearing it. I added the ruffly strip and flower at the bottom to add some extra cuteness. She was really not wanting to take a picture and this face was made in between crying. Maybe one day soon I can get a closer picture of the ruffle and flower.

When I get a picture of Abby in the orange dress I will post that too. I can't wait to see how it looks on her!

My posting might become even more scarce (if that's possible, I haven't been doing so good since the move) because we will finally be moving into our own house!!! Yeh! Everything we own will be under one roof instead of scattered in 5 different places (and that's not an exaggeration!). Hopefully, this time next week we will be out of our rental and making our new home ours.

Best wishes!

Wednesday, August 18, 2010

Summer Fun Dresses

Such sweetness!

Here are a few more projects that I have been up to lately. These were so easy and quick to make. This first one was kind of an uh-oh, but I like how it turned out. It is slightly long on Abby, but I fixed that and hope to have pictures to show you soon. I went to visit my sister and her son and daughter yesterday. While the kids were napping I got a hold of this dress to shorten it a bit. On each side and in the center of the front and back, I sewed a basting stitch the length it needed to be shortened. Then I pulled it tight creating ruffles and then tied the thread off. It resembled a roman shade. I think it will look much cuter than this long dress.


The yellow dress is adorable on her. It is a bit long too, but she will be able to wear it for a while. I used this tutorial here which is very easy to follow. This is the dress I was trying to make with the orange fabric, but I cut my fabric the wrong size. Oops. Oh well, I think it turned out cute. I love the cross over straps on the back! Ok, back to the yellow dress. I don't have any pictures of Abby wearing it, but maybe soon. Instead of standard, flat straps, I created ruffled straps which I think turned out really cute. And of course, the fabric flower was added for some extra cuteness.


Tuesday, August 3, 2010

Have you heard????

Have you heard about the new craze? The Silhouette? I have been hearing about it, but I had my eyes set on something else. Well Amy over at The Idea Room has a giveaway on a Silhouette. So I decided to check it out and see what all the fuss is about. I really like it. I think I might change my mind and ask for one of these for Christmas. (Please Santa I have really been good this year!) This bad boy can create vinyl lettering, it has a heat transfer tool so you can make really cool, custom t-shirts or pillows. You can also use it for glass etching, which I think is awesome! Check it out sometime, you might find a new best friend too!


Friday, July 30, 2010

iPod Shuffle Cozy

My sweet, wonderful hubby and I just celebrated our six year anniversary. He surprised me with an iPod Shuffle. I was very surprised because 1) we already celebrated our anniversary with our Jamaica trip and 2) he does not like the "a" word products (hint: it is a fruit as well). He even admitted that he broke one of his rules. But I love my Shuffle. I was unsure about not being able to choose a certain song, but I thought the Nano was too big. It turned out perfect for running and that is what I will mainly use it for. So far I love it!
Does this fabric look familiar? It is very special to me and has a lot of meaning. That is why I choose it. I wanted to be reminded of my sweet nieces every time I see it. I used this fabric to make matching outfits for my nieces. It is the last outfit I made for Hannah that she was able to wear.
Anywho, I needed something to carry my new accessory in. I made my sister a iPod cozy for her birthday, but once again I forgot to take pictures of it. I loved how it turned out. This is the tutorial I used . These cozies are super easy to make and they take no time at all. You could even make one for a camera or phone. Since my iPod is smaller I changed the dimensions a bit. I cut out two 3 1/2 x 10 strips. The final dimensions are about 3 x 4 (and that is just a guesstimate because I am to lazy to get up and get a ruler!) And instead of elastic I used an old stretched out thin, hair rubber band. I made the cozy a little bigger than what was necessary because I wanted it big enough to hold the USB connector too. It all fits perfectly. I love it!

I hope you enjoy and have a great weekend!

Monday, July 26, 2010

Baby Girl Sweetness

A friend of mine had a baby shower yesterday. She is having a girl which is great because it is so easy to whip up some girly gifts. All I had to buy was the onesies and the diaper wipes case. Which reminds me that I forgot to take a picture of it!!! Ugh! I hate when that happens. It was so cute with zebra fabric and pink ribbon and a green fabric bow. Oh well, maybe I can sneak a picture of it later.

So, all the fabric I used was scrape fabric leftover from other projects. Awesome! It's always a good feeling when you don't have to run to the fabric store to make some really cute gifts. Especially when there isn't a good fabric store near you!

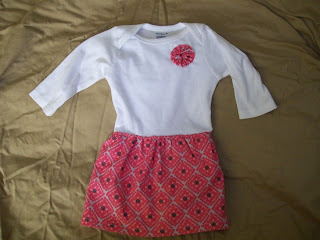
So here is a little dress that I made from a onesie. I didn't cut it, it still has the snaps on the bottom. I love how this turned out. I will post a tutorial a little later.

Disclaimer: Please excuse the wrinkled sheet background. As stated before, I am not a photographer! Maybe one day I will get a little better at taking pictures.
Next: The Ruffle Butt Onesie. This was featured at Ucreate about a year ago. I have been wanting to make this one for a while. So here it is....


Unfortunately, I don't have a model for this one. I can't wait to see it on! I did this a little different than the tutorial. I don't have a serger and I am not a fan of the fabric fraying. So, I sewed a tube and turned it right-side out and then created the ruffle. I love how it turned out. I can't wait to make some more.
And then you can never have enough burp cloths right? At least so I am told. So I made a couple. This one I really like because it curves in in the center so it contours to your neck. It looks like a big bone, but I think it will work very nicely.
Although it's not shown here (I swear I took more pictures than this! I don't know what happened to the others! Ugh!) the other side is a microfiber dish towel. That should be super absorbent!

I still have lots of scraps so I hope to start stockpiling some of these items to have them on hand when needed!

I hope you enjoy and have a Happy Monday!

Monday, July 12, 2010

Has anyone tried this yet...

GLASS ETCHING? I love this stuff. I could easily get addicted to this. This was a trifle dish that I have had for a while. I found the design online somewhere and traced it and the T. I used clear contact paper to trace it on and I think it worked great. Then I attached it to the glass and gobbed on the Armor Etch, twice for 10 minutes each.


This stuff is amazing. The hardest part is drawing and cutting out the design; especially if you don't have stencils or a nifty Cricut machine (which I am hoping that Santa will bring me one for Christmas).


I love how it turned out...


Sorry about the lovely pictures and the backdrop. I was in a hurry and couldn't think of a good background. And we are still in our rental (which I am very thankful for), but the wood paneling walls don't make for a very good background!
I think I might start getting out all my glass casserole dishes and putting my mark on them next. This would also be great wedding gifts. The possibilities are endless!

Have a good Monday!