My sweet, wonderful hubby and I just celebrated our six year anniversary. He surprised me with an iPod Shuffle. I was very surprised because 1) we already celebrated our anniversary with our Jamaica trip and 2) he does not like the "a" word products (hint: it is a fruit as well). He even admitted that he broke one of his rules. But I love my Shuffle. I was unsure about not being able to choose a certain song, but I thought the Nano was too big. It turned out perfect for running and that is what I will mainly use it for. So far I love it!
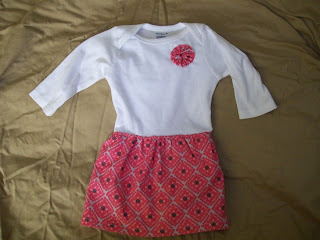
Does this fabric look familiar? It is very special to me and has a lot of meaning. That is why I choose it. I wanted to be reminded of my sweet nieces every time I see it. I used this fabric to make matching outfits for my nieces. It is the last outfit I made for Hannah that she was able to wear.

Anywho, I needed something to carry my new accessory in. I made my sister a iPod cozy for her birthday, but once again I forgot to take pictures of it. I loved how it turned out. This is the tutorial I used . These cozies are super easy to make and they take no time at all. You could even make one for a camera or phone. Since my iPod is smaller I changed the dimensions a bit. I cut out two 3 1/2 x 10 strips. The final dimensions are about 3 x 4 (and that is just a guesstimate because I am to lazy to get up and get a ruler!) And instead of elastic I used an old stretched out thin, hair rubber band. I made the cozy a little bigger than what was necessary because I wanted it big enough to hold the USB connector too. It all fits perfectly. I love it!

I hope you enjoy and have a great weekend!

 Next:
Next: 
 Unfortunately, I don't have a model for this one. I can't wait to see it on! I did this a little different than the tutorial. I don't have a
  Although it's not shown here (I swear I took more pictures than this! I don't know what happened to the others! Ugh!) the other side is a microfiber dish towel. That should be super absorbent!
 I still have lots of scraps so I hope to start stockpiling some of these items to have them on hand when needed!


 I think I might start getting out all my glass casserole dishes and putting my mark on them next. This would also be great wedding gifts. The possibilities are endless!