Wednesday, December 9, 2009

I'm a slacker....

But I have an excuse... I have been doing a few projects, and I have quite a few blogs brewing in my head, but I just haven't been posting! We are in the process of moving and thus we are living out of boxes, literally. Hopefully, by next week we will be in a rental and will be able to unpack and unload for a while. Thus, I will be able to resume with my projects and blogging ;)

I haven't been in a baking mood much this year. Maybe it's because all my baking tools are boxed up. I don't know, so what baking I have done this year has been really simple.
While I was at the store I ran across Andes mints chipped up into tiny pieces! These are my hubby's favorite. So I thought they would be delicious in some brownies.
I mixed the brownies according to package directions and sprinkled some mints into the mix, stirred it up, and put it in the oven. I added some more mints on top of the brownies after they had cooled. Obviously, I didn't think it through, b/c they mints didn't stay in place. Next time (and there will be a next time) I will add the mints during the last few minutes of cooking, or right when I take them out, that way they will be melted into the top. These are so yummy! I only used about half the bag, so I will be making them again very soon!
Yes, there's one missing. I couldn't resist!
There is another dessert that I made recently, but unfortunately I don't have pictures =( But it is very easy. It is a Raspberry Chocolate Cake. I used Devil's Food Cake mix. Cook it according to directions making two or more layers. Let the cake cool completely. On the bottom layer, spread raspberry jam generously on top; when you think there is enough, add a little more. Then place the top layer and spread some more jam on top of it. Spread the frosting on top and the sides and your done! The raspberry jam adds a very delightful flavor to the rich chocolate. You can use store bought frosting or make your on, whichever you prefer! I hope you enjoy! Maybe I will get in the Christmas baking mood soon!

Wednesday, November 18, 2009

Christmas Pillow Joy

A couple of weeks ago I came across a cute Christmas pillow with the word "JOY" in felt sewn on the front. It was so adorable. I didn't even look at the price because I knew it was way more than I would want to spend! While I was drooling over the pillow, my mother-in-law asked if I thought I could do something similar. Well, I really wasn't thinking about that, but I thought how hard can it be? So, I scooted on over to TJ Max and found this cute place mat. And it was only $1.99! How could I not buy it for that price?!?


This would be super cute on the table, but even cuter as a pillow! I happened to have some red felt (only because I went to Hobby Lobby with this project in mind!). After tracing out the word "joy" I appliqued it onto the front and stitched it down. I added some stuffing and sewed her up. I think she's quite pretty. Looking back, I kind of wish I had made the letters a little bigger, but overall I am pleased with how it turned out. And all for less than $5!!! And I bought two place mats so I need to get to work on the second one!!!


I love it and can't wait for the Christmas holidays! But it kind of makes me sad because it reminds me of all our Christmas decorations that we will not be able to bring out this year due to moving (for which I am very thankful). But that just means the next year will be very exciting; I will probably forget what all we have!

Tuesday, November 10, 2009

Finally...

Now I can post the final product! I have been waiting just in case the recipient happened to look at my blog. I had so much fun working on this! I posted a few of the items already, but here is the final product.


I really wish I had been more diligent of keeping up with the costs, but I wasn't. So I have no idea how much it cost, but I definitely know that purchasing a gift set like this would be way more than I paid!

I ended up making another diaper case that matched the diaper clutch. I really meant to add a strap on the clutch to put your hand or arm through, but totally forgot until I was completely finished! Maybe next time I will remember. I used two tutorials for the clutch. You can go here and here to get the directions.
I made this tissue holder to match. Here is very simple tutorial. So quick and easy to make!
There is also a burp cloth in there. I don't know why, but I didn't take a picture of just the cloth. It is the pink fabric with big white dots. The reverse side is a dark brown microfiber material. Super cute!
And then there is this blanket! I am totally in love with. It is super soft and I wish I made one for myself!
I had so much fun making these gifts. I hope they come in handy and she likes them! I can't wait to make some more!

Tuesday, October 27, 2009

Nursing cover

I am still working on my to-do list for my friend's baby shower in two weeks. This is a nursing cover that was super easy to make. I found the tutorial here at Made by the Mama Monster. She did a great job of giving directions and adding photos to go along with it. I can't believe that some places sell these for $40!!! I can't wait to make some more of these.

I added a few extras like the pocket on the bottom. It was very easy and would be great to store a pacey.
I also made a fabric flower to add on the strap.

I think it is super cute! I just hope the mama-to-be will like it!

Friday, October 23, 2009

What to do with all those scrapes?

If you are anything like me, you have a stash of scrapes like this:
and these:

I hate throwing things away! When I started this stash, I had no idea what I would use some of these pieces for! But I had faith that some creative person out there would have the answer! Well, I am thrilled that I was patient and waited to find the perfect purpose for these pieces and did not throw them out! I have been using them to make these:

There are two different ways to make these cute fabric flowers. You can use long, slender stripes of fabric or circles. I have a lot of fabric of both so I have been doing a mixture or each. Here is a tutorial for the stripes of fabric and here is one for the circles. I will say you don't have to have a perfect circle for the second tutorial. I had a square piece and just rounded off the edges and it worked fine. That will save a little bit of time.

There are endless possibilities for these cute assessories! You can make a bow, a pin, add it to gifts, etc. Check out the baby wipes case below. I just hot glued them on. It looks very impressive, but yet its so easy!

Thursday, October 22, 2009

Baby Stuff

I have been having so much fun making baby stuff! I have some friends who are expecting soon. Luckily, both are having girls so I can use the same fabric for both! I have a HUGE folder in my favorites filled with baby ideas. Now I finally get to try some of them out!

While I was browsing through my favorite store (Hobby Lobby of course!) the other week I realized they have fat quarters! It wasn't a huge selection, but there were several cute fabrics including these:

I had to have them! I think my favorite is the one on the bottom. I was amazed at how much these squares could accomplish. I ended up buying two, but have not even put the scissors on the second one! Here are my creations:


The square blocks were super easy to make and lots of fun! I will say the little blanket tested my nerves a bit. I am a bit OCD about a few things and the squares not lining up exactly was a bit frustrating! But I resisted the urge to tear it apart and try again! There is a tutorial here that's very easy to follow.

I was able to makeover this wipe case out of what was leftover of the green fabric. I am not totally sold on the pink ribbon with green dots, but it will have to do. That was all I could find at Wal-Mart and I was not going to go back to Hobby Lobby for the third time this week! The fabric flower is by far my favorite part of this case. I will post another blog on this!
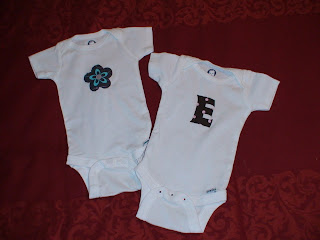
Then I raided my fabric scrapes for these next projects. I am falling in love with appliqueing! Once you get the hang of it, it becomes pretty quick and easy. I love, love the flower one. I just happened to find a template online that was the same shape as the flower on the fabric. So I had to use it!
And, because Christmas is right around the corner (I can't believe it!) I had to make a Christmas onesie! I think this is so cute! Its hard to see, but at the tip of the stocking is a little red crystal. They are also on the buttons. I don't know how long they will last, but it's cute while it lasts!

I have some more projects to do. I will be posting those soon! Happy Sewing!

Wednesday, October 7, 2009

Fall decorations!!

Finally, I started on my fall decorations. I don't have a whole lot, but I did have some spray painting to do before I could finish. I have been gathering ideas over the past few weeks from blogland. It was time to take action and get things done! I think my overall favorite are the beauties!

It started like this:

And this:
Not very attractive, I know. The idea came from here. I LOVE these candle holders (at least their shape)! I found them at TJ Max. It's pretty obvious, they don't match so I broke out the spray paint and fixed that problem! To my surprise the only black paint we had was a metallic looking black. So there is a slight sparkle to these if you look at them up close! The pumpkins came from the Dollar Store. They look great after a nice coat of paint!
This also came from the Dollar Tree. It's not too bad as is, but I wanted it black.
So it got a make over also and turned out like this:

I just need to figure out what can go inside it??? As for now, it is sitting on a shelf in our living room.
Bleeding candle sticks!!! Oooo. These are kind of cool. The idea came from here. This tested my patience a bit. The paint took a while to dry. And then it was kind of tricky to get the wax to drip just right. But it turned out pretty good. (Please disregard the tarnished candlesticks! That's one more thing I have been putting off!) It's kind of hard to see, but there is red wax dripping down the sides.

Vase makeover. So easy. That's why I like it! I found some cute scrapbook paper at Hobby Lobby and wrapped it around the vase.
Now we have a spooky vase! Love it!
That's a wrap! I might have to think of some more fall decorations to put out when Halloween is over! I just can't wait until Christmas!!!!

Wednesday, September 30, 2009

Spooky Apron

Whew! One more thing I can mark off my to-do list. This is for a friend who has a Halloween birthday. I hope she likes it! I originally thought this side would be the main one.


BUT I think I like this side better!


I guess I am obsessed with the frilly thing because it has made its appearance again! It's kind of hard to tell, but it is on the top part of the pockets. I couldn't resist. I had orange ric-rac, but I didn't have orange thread so I decided to go with the ribbon. I think it looks better than ric-rac would!


Now on to something else!!!

Tuesday, September 22, 2009

Mod Podge Lids

I have several spaghetti sauce jars and other jars that I have been hoarding and telling myself I would find a use for them. But I didn't know what to do with the lids. Until I ran across this blog.


So I turned these:


Into these:


As you can see, the small one (which, by the way is an old chicken bouillon container) has found its purpose. I think I might use the larger ones this Christmas for gifts; cookies in a jar. I haven't tried it yet, but I've been anxious to! This is such an easy project and it dresses up the jars so nicely! I have a few more to do and I will be done. My next Mod Podge project is to cover these boxes!


Thursday, September 17, 2009

Halloween & Frills!

I have finally put the scissors to the fabric and started cutting! The pumpkin fabric I bought for another reason, but scrapes always come in handy. I bought two black shirts for my niece and nephew then appliqued the pumpkins on the shirts.


Unfortunately, I couldn't find a black onesie, but I found this cute Halloween onesie.


As cute as it is, I couldn't leave it like that! I had to spruce it up a bit. I then remembered the orange scrapes of fabric from the Harley pillows. I was pretty sure I had kept it, but finding it was another issue! I luckily found it and also found some black ribbon with white polka dots! So I made little ruffles for the sleeves. They are so cute! The orange fabric will fray a bit, but it might add a little more character!


And a close up!


And I couldn't stop there!!! I had to add some ribbon to Hannah's shirt! I just used the ribbon, no orange fabric. It is just as cute, and now each one has their own festive shirt.


I still couldn't stop! I had to do a hair clip before I stopped. This turned out a little better than the last. Last time I skipped a step, oops. I guess it really does make a difference if you follow directions!

And here they are all together! I hope they enjoy!!!

Wednesday, September 2, 2009

Spruce up a regular white T...

I have seen several tutorials on how to make corsages for t-shirts. I have this ole drabby white t-shirt that needs a make over.


I bought this dress this summer which is made out of jersey. The great part about it was that you cut it to whatever length you wanted. So, I had about a foot of extra fabric. I have been holding on to it trying to decide what to do with it. Well, I think it has found its purpose! This is so easy! I have since looked through my closet to pick out shirts that have served their original purpose and need a new one. I am going to cut these up also and try to make some brooches like these cute ones.


I cut stripes of fabric about 2" x 6". With the sewing machine set for a straight stitch and the longest stitch available, sew down the center of each strip. Then pull on the bobbin threat and shape the strip however you want.


Like this! You can either hand-stitch each one on or use your machine. I started by using my machine, but found it easier to hand-stitch each one. I love how it turned out!!!


Ta-Da!!!

I can't wait to wear it!!!