Tuesday, April 6, 2010

Flirty Skirt

I have been holding on to this post for a while. I don't know why I have not posted it sooner because I absolutely love it. I finished it a while ago and I don't remember step-by-step what I did, but I will try to give my best description. It's pretty easy and pretty basic. This project actually started out for my oldest niece, but I messed up so I made it for the little one.

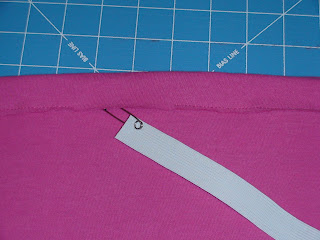
Before you start cutting, make sure you measure the little one. Unfortunately, my niece's and nephew live about 2 hours away, so I went to Wal-Mart and bought a skirt for the appropriate size; in this case 12 months. I measured the length and waist band. I wanted the top section longer than the bottom. I guess the top section is about 2/3 bigger than the bottom. Be sure to add about a 1/4" for seam allowance and add extra length for the elastic. I added about 6" to the width to make it scrunchy. First, sew the side seam of the top band together. Then sew the tube for the elastic. Make sure you leave about a 2" gap to insert the elastic. For your bottom band, you can pretty much make it as long as you want; depending on how ruffled you want it. To make the ruffles, adjust your stitch length to the highest possible. Sew about a 1/4" from the edge. Do not backstitch and make sure to leave some extra thread on the ends. Pull the thread so the ruffles begin to form. Sew the raw edges together. Pin it to the top band with the right sides together working the ruffles so that they are consistent all the way around and sew. Double fold, iron, and pin the unfinished edge of the bottom band and sew to make the seam. At this point, it should look like this:


I apologize that I don't have pictures of the previous steps. I got a little frazzled when I realized I messed up and stopped taking them! As you can see, once I figured out it would work out for the little one I started taking pics again.

Thread the elastic through the tube. Before I finish the seam, I like to pull the overlapping ends of the elastic out far enough to sew them together. Then finish the tube and your done! Step back and visualize how cute the little one will be!

This skirt wouldn't be complete without a cute matchy shirt! So I created three yo-yo flowers and sewed them on the shirt. (Oh my gosh, I can't get enough of those chubby arms!)

Here's the little model! She is so happy because I have finally given in and let her play with my phone! She is busy trying to figure it out!

Still trying to figure it out!


And the fabric petal flower I made here matches perfectly. I am so glad they are finally staying in her hair!

I bought some fat quarters at Wal-Mart the other day. I am going to try to make some more of these fun skirts out of those. Hope it works!!! And I hope you enjoy!


Sarah

Sunday, April 4, 2010

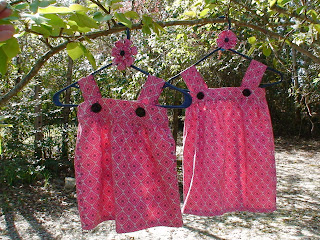
Spring Dresses

Happy Easter! This has been a wonderful Easter for us. We were able to spend it with my parents and my hubby's parents, sister, bro-in-law and their kids. My sister-in-law and I gave up sweets for lent. So needless to say, I have been feasting on sweet things all throughout the day! I bought some milano cookies Friday in preparation for today. They are now calling my name. I might have to get one very soon. I hope everyone else has had a blessed Easter. It is one of my favorite holidays; it pretty much is a tie between it and Christmas!

Now on to business! I finally have a new post!!!!! Yah! It has been quite difficult to make myself sit down and create a post. But I am doing it now!!! I know it's about time!

I bought this book about a month ago. It has some really cute things in it. One of them being this adorable dress.

My precious niece just turned 1! I can't believe that she is already one. Here is the little princess herself. As usual, caught in action getting into something...

So this is her birthday gift. And she also has an older sister. The other little princess.

How could I resist making her a matching dress!! They are going to look so cute in these! I just hope they fit! That always makes me so nervous!

Here is the back of the dress. (Sorry for all the shadows! I had to take what I could get, the wind wasn't cooperating!)

And of course some hair accessories to match. I am not to fond of the bottom one. I figured out my mistake and made the petals wider on the second one. It looks much better. Go here for the tutorial on making the petals.


And these two princesses also have a handsome brother. I couldn't not feature him! I didn't make him a matching outfit! I don't think his father would approve ;)


I hope you enjoy and remember our Redeemer lives!!!!

Friday, March 12, 2010

New Friend Friday

Wow, it has been too long since the last blog. My apologies! Things have been crazy lately! I am hopeful that things will get a little better soon. (Yeah right, does that ever happen?)

I am so ready for spring to get here! Hence the springy new background. We have had a pretty good winter here in south Georgia. I actually like cold whether (unlike many south Georgians) and we have had a pretty cold winter this year. It even snowed!!! And it stuck to the ground! But, now that April is right around the corner, I can't wait for things to start warming up a bit. I have a few projects that I will hopefully be posting soon. And hopefully we will be moving so there will be lots of decorating projects. That's my hope anyway!

The Girl Creative is hosting a New Friend Friday party! Check out her blog and meet some new blogger friends! I sure will be!


The Girl Creative

Tuesday, February 16, 2010

Snazzy Picture Frames


Here's just another craft that I have been dabbling in. The frames I bought at Michael's. Unfortunately, I can't find them online. And the closest one is about 1 1/2 hours away. So, it might be a little while before I can make some more. These are so easy.

Frame + Modge Podge + Scrapebook paper = Snazzy Frame.


Leave it as is or add a decorative flower.


{This one is by far my favorite!!!}

I am working on one more frame and will post it later.


I am trying to decide if I want to start selling these on Etsy. Any suggestions?

Thursday, January 28, 2010

Hair bows galore!!!

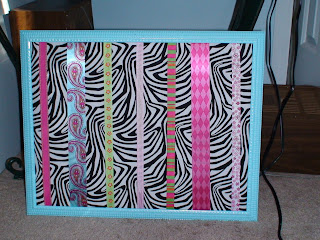
Have you seen all the cute hair bow holders floating around blogland? Oh the possibilities!!! They are so cute. I thought this would be great gift for my beautiful niece and adorn it with hair bows!!! Her birthday was a few days ago, but I went ahead and gave it to her early. I think she really liked it ;) And these hair bows! Oh, they are so easy to make. Once I got started making these bows, it was really hard to stop! I didn't realize how fun it is!

I was not so lucky as others out there who found frames for $1 at thrift stores, but mine was on sale! I got it at Michael's for $10; it was 50% off. Not too bad. So with the help of my dad, I spray painted the frame with this cute turquoise spray paint.


Using the matte board that came with the frame, I cut out some batting about 2 inches longer on each side and then hot glued it around the edges.


I cut the fabric a little longer than the batting. Then I laid the board on top of the fabric and hot clued it on all sides. Then I measured the ribbons and decided on the placement and hot glued them as well. Then added the back of the frame and I was done!!! Easy peasy!
After the frame was done, I proceeded to make these cute bows. My sister gave me some ribbon for Christmas so I put it to good use! I used this tutorial to line the clips with ribbon. Most of the bows were made by making four or six loops (two or three on each side) making sure to hold it securely in the center. To secure the bow, tie the center with thick string. Cut a coordinating ribbon big enough to wrap around the center. Place a dab of glue in the center on the back of the bow and put the end of the ribbon on it. Add another dab of glue and wrap the ribbon around, making sure to cover the string holding the loops together. Then place some glue on top of the clip and press and hold the bow on it for a few seconds.


These are fabric flowers that are great if you have scrapes. They are left over from this post. I am just now finding out a use for them!!! Adorn them with a cute button and you have a cute, unique bow.
Then there are these cute little barrettes. Here is an easy and quick tutorial. I think these are very cute. Something great to do while watching TV or during long car rides!

I can't wait to make some more cute hair bows. I have two little girls birthdays coming up in March and April!!! I should be able to get a lot done between now and then!

Add all the cute bows to accessorize!

Monday, January 25, 2010

T-shirt refashion into girls skirt


This is super easy to make and super cute! I can't wait to see this on my niece (I know I always say that, but I really can't wait). My mom gave me a trash bag full (seriously, a full trash bag!) of t-shirts. So I have a lot of refashioning to do!

I love working with t-shirts because it doesn't fray; makes my life so much easier.

Start out measuring the little princess, waist and length from waist to knee. Add an inch to the length (my elastic was 3/4" and I added 1/4" for seam allowance), and measure from the bottom of the shirt up. This way you can use the original hem for the bottom of the skirt. Cut straight across the shirt.


Turn the shirt inside out. Fold and pin the cut edge an inch, don't worry about the cut edge, it won't fray. Sew around the skirt leaving a two inch gap for threading elastic through. Attach a safety pin to one end of the elastic and thread it through. Make sure the other end does not get pulled into the tube!

Overlap the elastic about an inch and pin it in place. Stitch the opening closed and sew from top to bottom of elastic to hold it in place. I also sewed from top to bottom on each side so the elastic won't twist.


That's it! Your done! I told you it was easy!


Now it's time for the fun part. You can leave the skirt as is or you can embellish it. Embellishing is always fun! I cut out another strip from the t-shirt, about 1 3/4" wide and 8" long.


This was my biggest flower. I cut the other two flowers smaller because I didn't want them all to be the same size. Now, adjust your sewing machine stitch length to the longest possible. Fold the strip in half and sew along the raw edges, do not back stitch. When you reach the end, make sure you leave some extra thread. Starting at one end, pull on one thread until the fabric starts to gather. Form the strip into a flower shape and attach to the skirt.


How cute is that!?!


You can also do frilly strips of fabric instead of flowers. The possibilities are endless! Now I have to go make some more!

Thursday, January 21, 2010

My first purse!

And my first sewing project from scratch without a pattern! That's quite an accomplishment for me (having a strong type A personality!) But I did it. I started out taking pictures and had planned on doing a tutorial, but I left my camera at home (sewing things are at my parents) on day two. So no picture tutorial. I will try to explain the process without the pics. I debated whether to do this tutorial at all, but decided to go with it. There are two reasons: I hope that it might help someone out there and to help me next time I make a purse.

I know the long list of things to do looks intimidating, but trust me, it's pretty easy (I mean I did it!) This was fun to make and I am sure I will be making more.

Supplies: Three coordinating fabrics (I started out with 1 yard each so I am not sure how much was needed. I would say 1/2 yard each for main fabric and lining and 1/4 yard for remaining fabric.)
Medium weight interfacing
Coordinating button

Start out cutting out the lining fabric to the shape you want. I just eyed the angles and when it was all cut out, I rounded off the corners (or you can leave the corners angled). You can fold it in half to make sure it is symmetrical. Then take some wax paper and trace the outline on it so you will have it for next time!

Using a different fabric from the lining, cut out a piece for the inside pocket. I am not exactly sure how big mine was, probably 6x8 inches. Fold the top edge down 1/4" twice, ironing after each fold then sew. Fold and iron each side and bottom 1/4" working clockwise and then fold again. With the inside of the pocket facing up on your sewing machine, sew around the sides and bottom close to the edge (so when you are done, the fold should lay flat). Then pin the pocket on the lining and sew around the sides and bottom, close to the outside of the pocket. If you want, sew a divider from top to bottom.

Then cut out the front and back piece for the exterior. Cut the front piece into three symmetrical panels. Using the middle piece, cut out the middle panel on the third fabric. Sew the panels together to form the front of the purse.

Attach the interfacing to the outside pieces. (I used an iron-on interfacing. I found it really easy to use. You can also apply interfacing on the lining fabric if you wish). Center the front side (the paneled side) to the back side, right sides together. Trim the back side; it will be a little bigger than the front because of sewing the panels together. Pin the pieces together and sew the two sides and bottom together. Make sure you back stitch.

Sew on a coordinating button, centered on the outside front piece towards the top (this way you won't see the thread on the lining).

Use the outside as a template to trim the lining. Pin lining pieces, right sides together and sew sides and bottom.

Now, for the straps. My straps were about 24 inches. I cut out two stripes, 25 x 4. Iron on the interfacing if you want a sturdier strap. Fold strap in half with right sides together and sew the long side of the strap. Turn right side out and iron with seam on the side.

Turn lining right side out and place inside the outer pouch. Make sure side seams are lined up. Pin edges together. Decide on the placement of the straps. They will need to be placed inside the pouch between the two layers. Make sure the straps aren't twisted. (The ends of the straps should be sticking out at the top where you are about to sew.) Sew all the way around the top edge of the purse, leaving a 5 inch gap for turning. Make sure you back stitch over the straps to make it more durable.

Turn the purse right side out and tuck the lining in side. Fold over and iron the gap and pin in place.

Cut out a 3/4" x 4" strip. Fold the strip in half and iron. Next, unfold the strip and bring the edges to the center line and iron both edges. Then fold in half on the first ironed line (there should be no raw edges showing; trust me this is much easier than trying to turn it right side out!)

Line up the strip with the button and pin in place. Top-stitch around the top of the purse and then you are done!

I made a fabric flower to add to the front. (Unfortunately I made it after I took the pics, so that didn't make it)

Wow, I didn't know the tutorial would be so long!!! I hope it helps and someone finds it useful. Next time I will remember my camera!

Here's a look inside. The pocket is divided into two sections.


And the back view:


Good luck with yours!